This project provides a placeholder for various sample VNF (Virtual Network Function (VNF)) development which includes example reference architecture and optimization methods related to VNF/Network service for high performance VNFs. The sample VNFs are Open Source approximations* of Telco grade VNF’s using optimized VNF + NFVi Infrastructure libraries, with Performance Characterization of Sample† Traffic Flows.
* Not a commercial product. Encourage the community to contribute and close the feature gaps.
† No Vendor/Proprietary Workloads
SampleVNF supports installation directly in Ubuntu. The installation procedure are detailed in the sections below.
Connected to the DUT is an IXIA* or Software Traffic generator like pktgen or TRex, simulation platform to generate packet traffic to the DUT ports and determine the throughput/latency at the tester side.
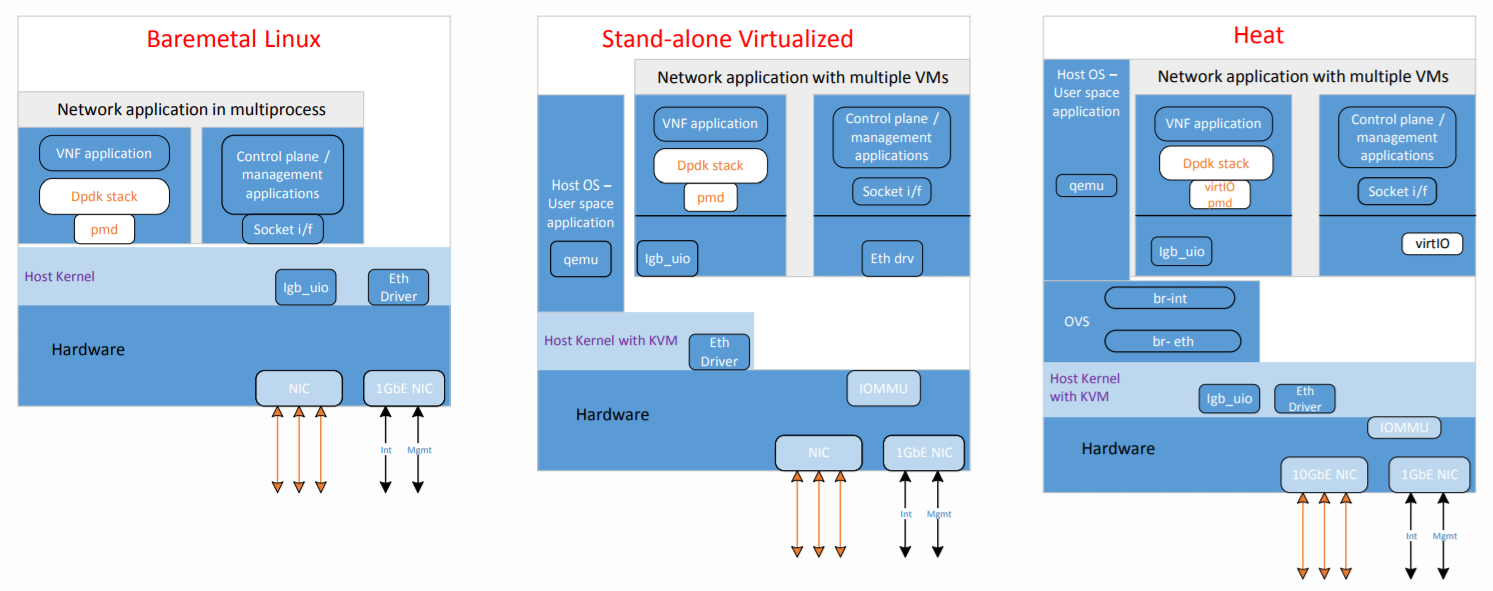
Below are the supported/tested (VNF) deployment type.
SUT requirements:
+-----------+------------------+
| Item      | Description      |
+-----------+------------------+
| Memory    | Min 20GB         |
+-----------+------------------+
| NICs      | 2 x 10G          |
+-----------+------------------+
| OS        | Ubuntu 16.04 LTS |
+-----------+------------------+
| kernel    |  4.4.0-34-generic|
+-----------+------------------+
| DPDK      | 17.02            |
+-----------+------------------+
Boot and BIOS settings:
+------------------+---------------------------------------------------+
| Boot settings    | default_hugepagesz=1G hugepagesz=1G hugepages=16  |
|                  | hugepagesz=2M hugepages=2048 isolcpus=1-11,22-33  |
|                  | nohz_full=1-11,22-33 rcu_nocbs=1-11,22-33         |
|                  | Note: nohz_full and rcu_nocbs is to disable Linux*|
|                  | kernel interrupts, and it’s import                |
+------------------+---------------------------------------------------+
|BIOS              | CPU Power and Performance Policy <Performance>    |
|                  | CPU C-state Disabled                              |
|                  | CPU P-state Disabled                              |
|                  | Enhanced Intel® Speedstep® Tech Disabled          |
|                  | Hyper-Threading Technology (If supported) Enable  |
|                  | Virtualization Techology Enable                   |
|                  | Coherency Enable                                  |
|                  | Turbo Boost Disabled                              |
+------------------+---------------------------------------------------+
The ethernet cables should be connected between traffic generator and the VNF server (BM, SRIOV or OVS) setup based on the test profile.
The connectivity could be
e.g. Single port pair link0 and link1 of VNF are used
TG:port 0 <------> VNF:Port 0
TG:port 1 <------> VNF:Port 1

For correalted traffic, use below configuration
TG_1:port 0 <------> VNF:Port 0
                   VNF:Port 1 <------> TG_2:port 0 (UDP Replay)
(TG_2(UDP_Replay) reflects all the traffic on the given port)
e.g. Two port pair link 0, link1, link2 and link3 of VNF are used
TG:port 0 <------> VNF:Port 0
TG:port 1 <------> VNF:Port 1
TG:port 2 <------> VNF:Port 2
TG:port 3 <------> VNF:Port 3

For correalted traffic, use below configuration
TG_1:port 0 <------> VNF:Port 0
                     VNF:Port 1 <------> TG_2:port 0 (UDP Replay)
TG_1:port 1 <------> VNF:Port 2
                     VNF:Port 3 <------> TG_2:port 1 (UDP Replay)
(TG_2(UDP_Replay) reflects all the traffic on the given port)
- OVS_DPDK
- Refer below link to setup ovs-dpdk http://docs.openvswitch.org/en/latest/intro/install/general/ http://docs.openvswitch.org/en/latest/intro/install/dpdk/
- Openstack
- Use any OPNFV installer to deploy the openstack.
Interactive options:
./tools/vnf_build.sh -i
Follow the steps in the screen from option [1] –> [10] and
select option [9] to build the vnfs.
It will automatically download selected DPDK version and any
required patches and will setup everything and build VNFs.

Options [8], If RestAPI feature is needed install 'civetweb'

Following are the options for setup:
----------------------------------------------------------
Step 1: Environment setup.
----------------------------------------------------------
[1] Check OS and network connection
[2] Select DPDK RTE version

----------------------------------------------------------
Step 2: Download and Install
----------------------------------------------------------
[3] Agree to download
[4] Download packages
[5] Download DPDK zip
[6] Build and Install DPDK
[7] Setup hugepages
[8] Download and Build civetweb

----------------------------------------------------------
Step 3: Build VNFs
----------------------------------------------------------
[9] Build all VNFs (vACL, vCGNAPT, vFW, UDP_Replay, DPPD-PROX)

[10] Exit Script
non-Interactive options:
./tools/vnf_build.sh -s -d=<dpdk version eg 17.02>
1. Download DPDK supported version from dpdk.org
   * http://dpdk.org/browse/dpdk/snapshot/dpdk-$DPDK_RTE_VER.zip
   * unzip dpdk-$DPDK_RTE_VER.zip and apply dpdk patches only in case of 16.04 (Not required for other DPDK versions)
   * cd dpdk
   * make config T=x86_64-native-linuxapp-gcc O=x86_64-native-linuxapp-gcc
   * cd x86_64-native-linuxapp-gcc
   * make -j
2. Add this to Go to /etc/default/grub configuration file to setup hugepages.
   * Append “default_hugepagesz=1G hugepagesz=1G hugepages=8 hugepagesz=2M hugepages=2048” to the GRUB_CMDLINE_LINUX entry.
3. Setup Environment Variable
   * export RTE_SDK=<samplevnf>/dpdk
   * export RTE_TARGET=x86_64-native-linuxapp-gcc
   * export VNF_CORE=<samplevnf> or using ./tools/setenv.sh
4. Build SampleVNFs e.g, vACL
   * cd <samplevnf>/VNFs/vACL
   * make clean
   * make
   * The vACL executable will be created at the following location
     <samplevnf>/VNFs/vACL/build/vACL
Standalone virtualization/Openstack:
Build VM image from script in yardstick
1) git clone https://git.opnfv.org/samplevnf
2) cd samplevnf and run
   ./tools/samplevnf-img-dpdk-samplevnf-modify tools/ubuntu-server-cloudimg-samplevnf-modify.sh
   Image available in: /tmp/workspace/samplevnf/xenial-server-cloudimg-amd64-disk1.img
To run VNFs. Please refer chapter 05-How_to_run_SampleVNFs.rst